Tuesday, March 2, 2010

Drawing twirls in Illustrator

In Illustrator you can make your own brushes which makes it so much easier to draw twirly branches and twirls in general. Here's a tut about how to make fancy twirls in Illustrator.

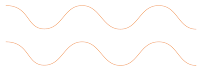
First of all draw a nice curvy line with either the pen tool or which ever tool you prefer.

Make a spiral with the spiral tool. Join the ends of the spiral and the curvy line by selecting the two ends with the direct selection tool (hollow arrow) and either hitting command J or via the menu Object>Path> Join.

Illustrator will join the two lines. If the anchor points are on top of each other then a 'Join' panel will appear. Select the option smooth.

The 'wave' and the spiral have now become one line. Draw some more branches using the method above. make sure the branches overlap each other as shown below.

Now we are going to make a brush.
Draw a triangle as shown below. Select the triangle and drag it into the Brushes panel.

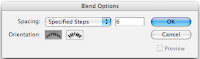
The New Brush panel will appear. Select 'New Art brush'.

An option panel will appear. Be sure to select Tints in the colorization method. This is important or else you won't be able to change the colour at a later stage. give the brush a name and click OK.
The brush will now appear in the Brushes panel.

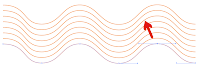
Select all the branches and click on the on the brush you just made. the strokes will now change, but are still strokes. Select the smaller branches and change the point size to vary the thickness of the branches.

The branches are still strokes and need to be expanded. Select the 'branches' go to Objects> Expand. In the 'Pathfinder' panel click on the 'Shape modes' Unite icon (top left) to make one shape of the branches.
'Pathfinder 'in CS3 works differently then in CS4. In CS3 you will need to delete the middle path before using the 'Pathfinder unite' and then click on 'Expand'.

The branches are now shapes which can be given a fill and stroke. Using the Expand function and the 'Pathfinder Unite' you can add more branches, twirls and shapes.


Thursday, February 11, 2010

InDesign tip: Hidden characters

So you are taking over another persons InDesign project, you change the mode to normal and turn on the hidden characters and whoa, what are all these squiggles and blue characters? It can be quite the puzzel to figure these out, so here's a list with explanations.

A non joiner separates a ligature. Place the cursor between the two leters and add a non-joiner.

Friday, January 29, 2010

Yes! I'm in

It's fun friday and this film is sooo funny. We see it all the time on TV. The clicking sound of a keyboard and then 'Access denied' flashes across the screen. I don't know about you, but I have never seen that (but it could be a mac thing). And then the exclamation 'Yes, I'm in'. In where?
And don't we all love it when they enhance the image or zoom in on a low res picture and the image becomes so clear that they can identify the suspect in the reflection of a window.
I don't understand why the dutch 'Opsporing Verzocht' a serious TV programme, that is asking the viewers to identify criminals in action who have been caught on tape doesn't 'enhance' the picture or vid so we have a decent image of the person? They do it on CSI. This is a youtube comp (via John Nack) that will be very familiar to you all. The latest craze in solving the crime, 'Enhance that'

Friday, January 22, 2010

Fun Friday

It already Friday. Don't know about you guys, but time really flies and in fact it is already Friday afternoon on this side of the pond, but still Friday. I was glancing through my tweets and one of my followers had posted the following link to 'Clients from Hell' There are loads of them and some of them are hilarious. One of my favorites is the client asking to print in RGB, because one less colour would be cheaper. Here's the link. Clients from Hell. My thanks to plan2ontwerp.
Have a great weekend.

Wednesday, January 20, 2010

Illustrator tip. Quick cool waves

Cool and colourful waves, that may look complicated, but can easily be made in illustrator.
Here's how I made the wave at the end of this post.

Draw a squigly line with the pen tool. make sure the fill is set to none.
Select the line with the Selection tool and while holding down the Alt and Shift keys drag a copy of the line below or above the original.
Double click the Blend tool in the toolbox to open the Blend Options panel. Set the spacing to Specified Steps and enter a value of 6.

Click OK. Click with the Blend tool tip on an anchor point and then on the 'same' anchor point on the other line. (The tip of the blend tool fills when hovering above an anchor point.)
Activate the Direct selection tool (open arrow) click and drag any of the anchor points.
In this example I moved several of the anchor points and changed the colour of the bottom line to create the gradient.
You can even add anchor points to change the shape of the wave.

Wednesday, December 9, 2009

illustrator tip:Rounded rectangle

So I haven't been active for a while on my blog, that's because I have been keeping a dutch one for my work. Which I suppose I could easily translate and copy to here, uhmm… bad excuse, however that sounds better then I don't have time because we got a puppy, which is the truth. Boy, puppies need a lot of time, but she is worth it.

Well here's the tip.

When you use the rounded rectangle tool by dragging, the corner radius used is the last value entered in the rounded rectangle panel's corner radius field. The size you determine by dragging, hold down the Space bar to change the position and hold down the Alt key to draw from the centre. Here's how you can alter the corner radius while dragging.

1. Select the rounded rectangle tool and drag a rectangle. Do not release the mouse.2. Use the up arrow to increase the corner radius.use the down arrow to decrease the radius.The left arrow makes it a rectangleand the left arrow gives you the maximum corner radius.Once you release the mouse the arrows function as the always do, to move selected objects.

I will try to be better at leaving tips, I have enough up my sleeve, but look at the picture below to see what's keeping me very busy. Leslie and Minou. And yes, baseball.

Friday, June 12, 2009

Illustrator tip: Resizing your artboard in CS4

This tip is only for CS4 users. (IMHO it's worth getting if you don't have it yet )
Say you've made an illustration on an A4 sized artboard, but your illustration is a lot smaller and you want to get rid of the excess white paper. That can easily be solved.
In the example below the black stroke is the A4 paper.
1. Draw a rectangle on top of the illustration. This will be your new page size. Make sure the rectangle is selected.2. Select the Artboard Tool (shift o) to select the A4 artboard.3. Double click on the rectangle. The rectangle now becomes the new page size.4. Select the rectangle with the direct selection tool and delete it. You now have an artboard (page) the same size as the rectangle.
And because it is fun friday check out this site Logolounge. Actually this is serious stuff for designers.