I was asked to make a promotional flyer for our local Baseball team to recruit young players It needed to be done immediately so no time to go through the proper channels and get the scalable vector logo. You guessed it …Yes, I was given a JPEG.
I used live trace in Illustrator and cleaned it up to make a usable logo. But, Live trace uses loads of compound paths, a white background a lot of excess baggage. I cleared all that clutter using the appearance panel.
 Here's how I did it.
1. Strip the logo down to just one shape.
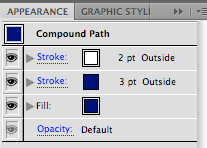
 2. Select the shape. Open the appearance panel. using the flyout menu choose Add New Stroke. The colour is the same as the logo, 3 pts and set to outside.
 3. Add New Stroke again, this time set the stroke colour to white, 2 pts, and to outside. Play with the appropriate stroke sizes as long as the top stroke is smaller then the one(s) below.
Now you have single shape.
 That was fine until I needed to have the white stroke to be transparent. Take away the white stroke and you have a 5 pt blue stroke around your logo.
 Here's how to do that.
1. Select the logo. Go to Object>Expand Appearance. The logo is now separated into different objects.
2. Using the Group Selection Tool (white arrow +) carefully select the inside blue shape of your logo, while holding down the Shift key select the outerblue stroke. With both objects selected open the Pathfinder panel Window>Pathfinder and click the Unite button. (Top row left)
3. Holding down the Shift button select the white stroke and click on the minus front button in the pathfinder panel (right of Unite button). The "stroke" is now transparent.


No comments:
Post a Comment